Configuration
This section describes how you configure Lime BI. You need to configure Lime BI in these places:
- Runtime Config
- If web client: Start Page
- If desktop client: Desktop Client
Runtime Config
Use Lime Admin to configure the Runtime Config.
Widget Config
Only for the web client
Configure the different widgets you want to embed under widgets. Config parameters are described here and validated by Lime Admin.
Label
The label should be short and descriptive as the title of the diagram. They are localized using an array with objects each containing language code and label text. A default label can be used as fallback if the browser is using a language which has not been specified.
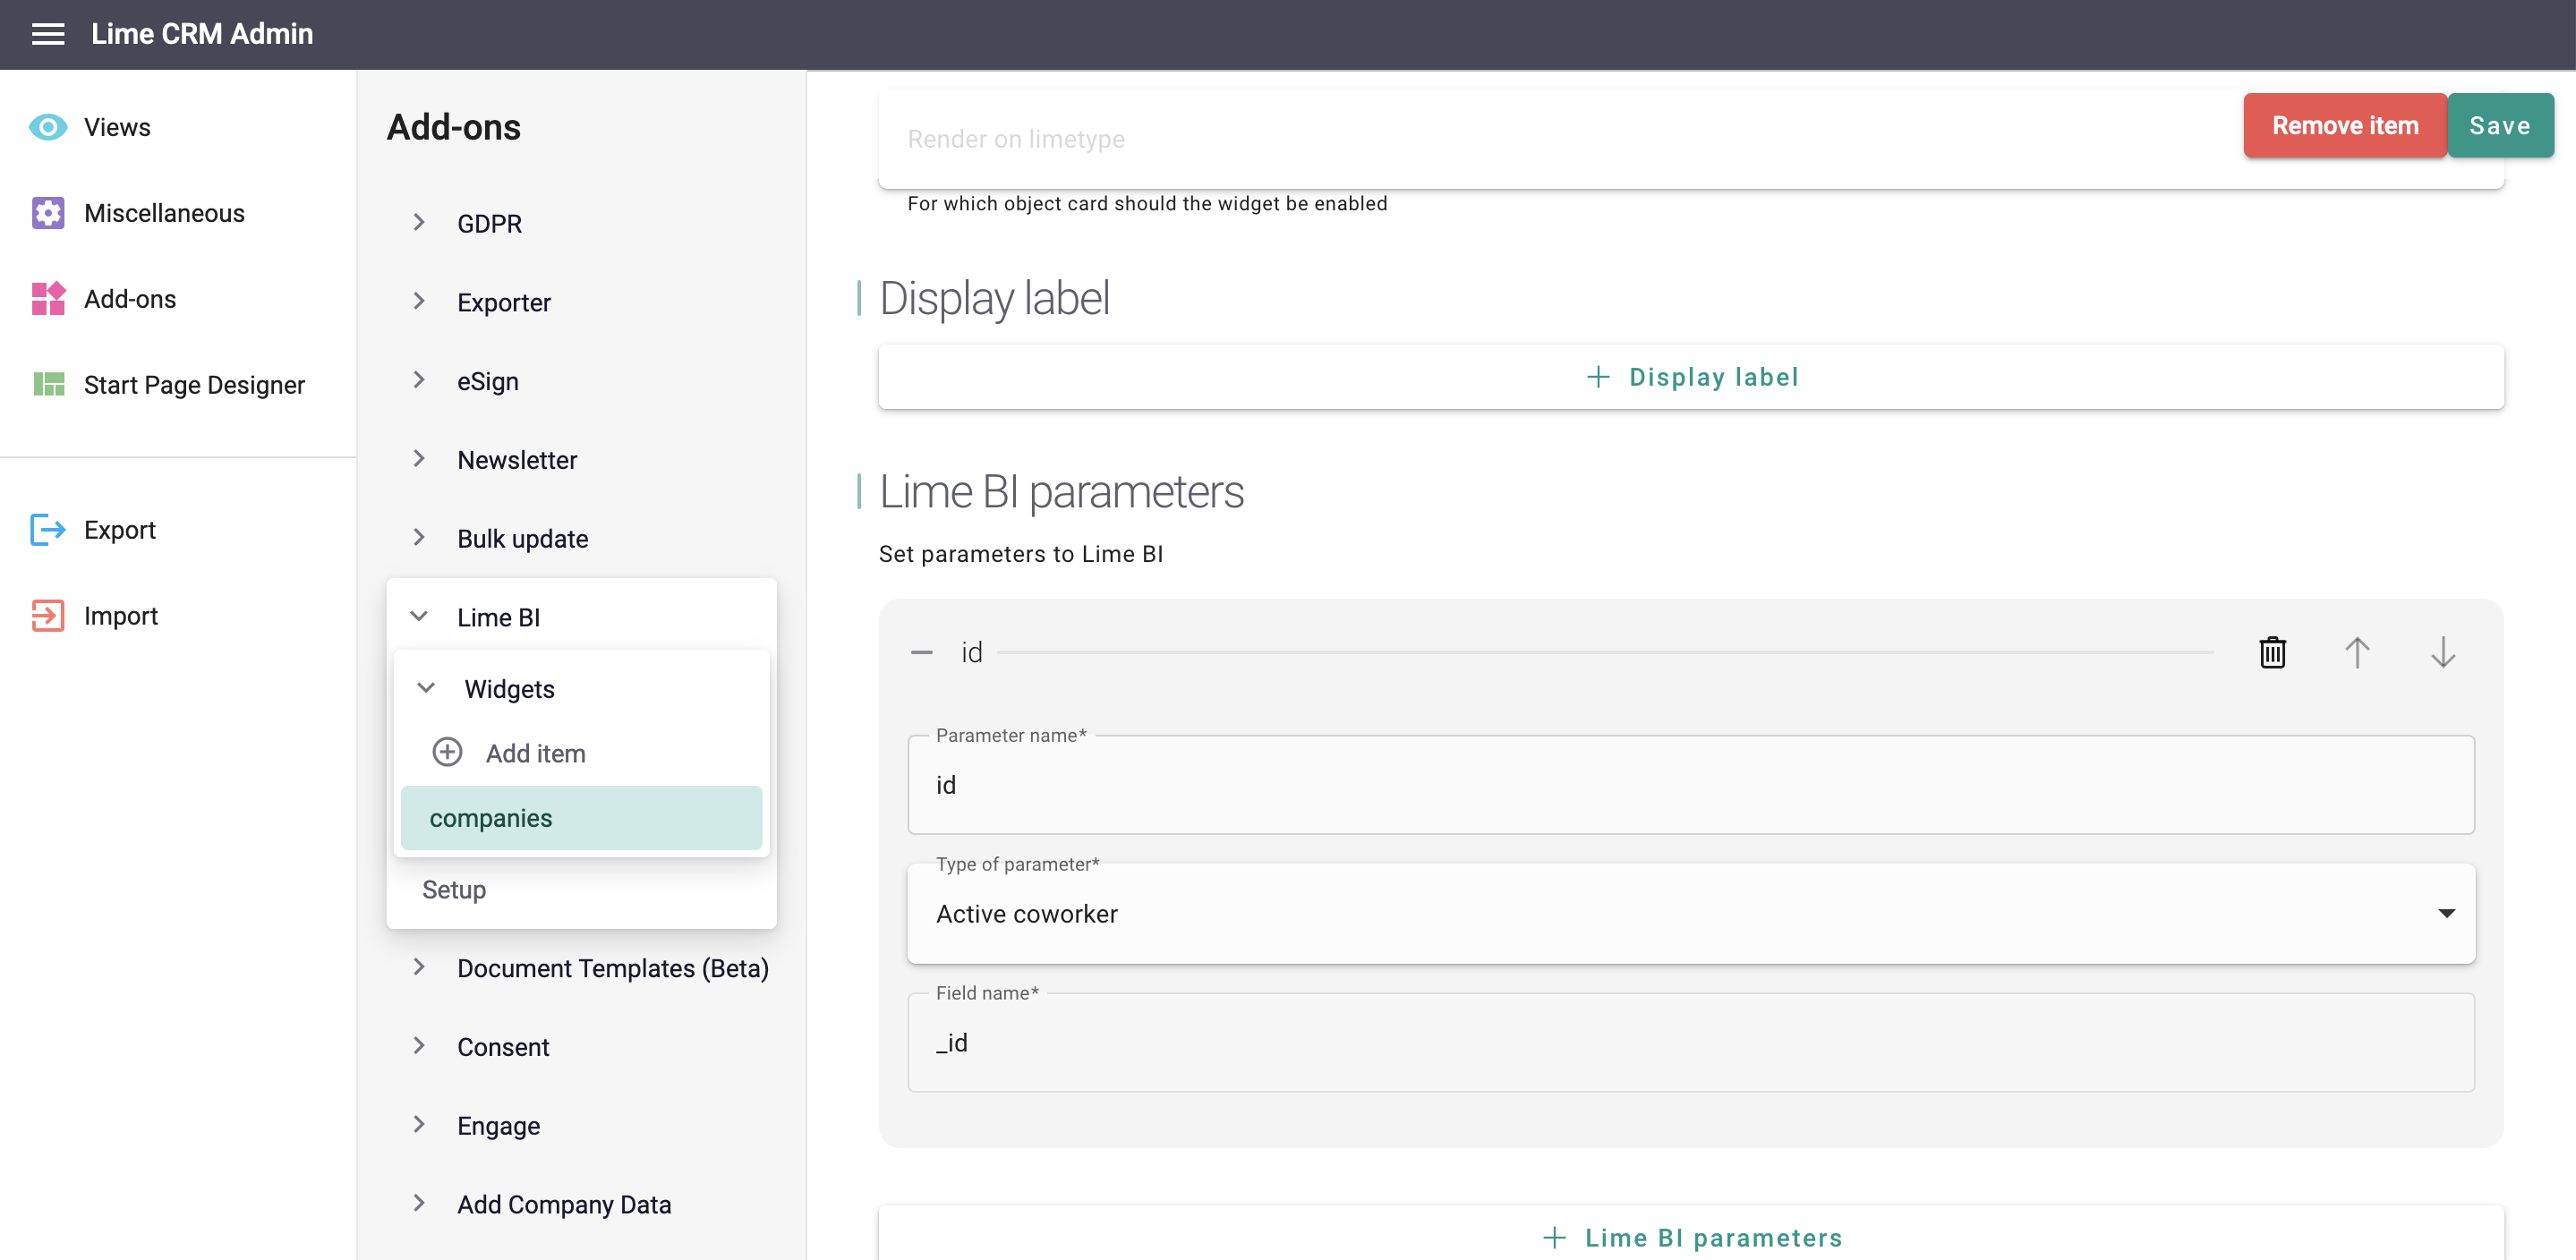
Lime BI Parameters
| Property | Value | Default Value | Comment |
|---|---|---|---|
name |
string |
N/A | Required. Name of the parameter in Lime BI. |
type |
string |
N/A | Required. Options: activeUser or activeObject. |
field |
string |
N/A | Required. What field to use on the given object i.e. _id, name, email |
Parameters can be used in a question with dynamic SQL or as a filter value in a dashboard. You can configure it to use fields from the active coworker (logged in) or the active object you're in.
When the diagram is displayed in the client without any context of the active object (e.g. on the start page), it will include an input field where the user can change the value, which will re-render the diagram.
On the object card that context is provided and the diagram can be rendered with the value of the current object.
Further down you can see examples of how it can be configured.
Filter in a Dashboard
If you are in editing mode for a dashboard you can add filters using the icon in the top right corner. When you do, you select what that filter should correspond to for each question in the dashboard. You can also set a default value for the parameter.
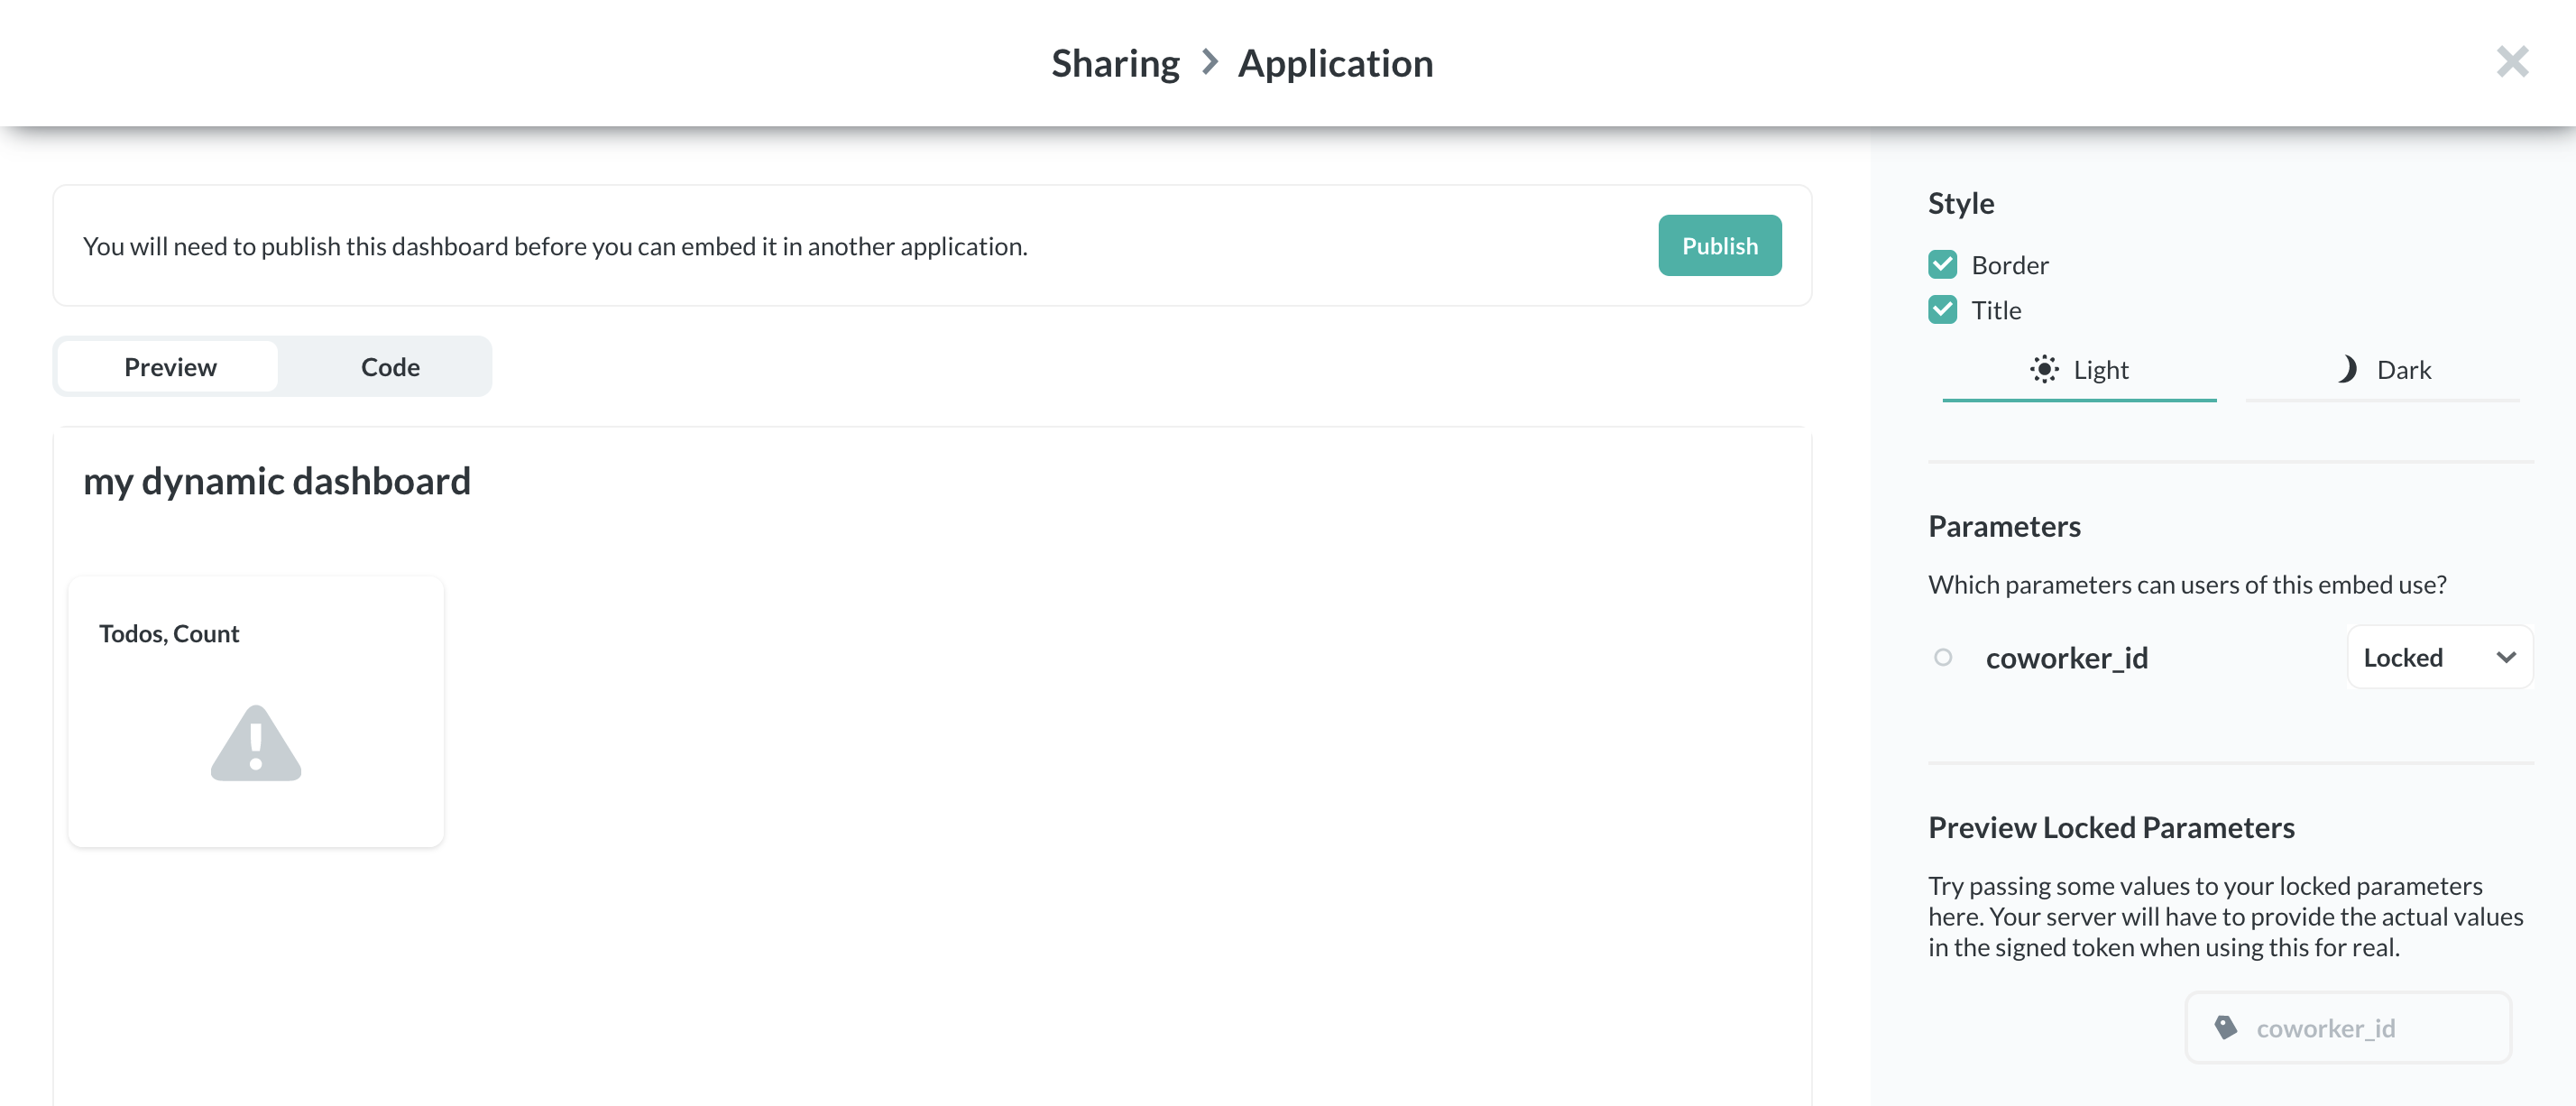
To be able to embed an image with parameters, set the parameters as locked when you publish the embedding, as shown in the image below:
Dynamic SQL in a Question
A SQL query behind a Lime BI question can include a dynamic part which is described as {{VARIABLE-NAME}}.
You'll find the SQL editor in Lime BI by clicking first on the Show editor button on a question, then on View the SQL, and finally Convert this question to SQL. The buttons are located in the upper right corner.
Example with active Company (using dynamic SQL in a Question)
The following example returns the sum of all deals' value in the dashboard but on a specific company it only shows the sum of that company's deals. I.e. results are depending on the company_id at the time of the execution.
Example in Lime BI SQL editor
SELECT sum("dbo"."deal"."value") AS "sum"
FROM "dbo"."deal"
WHERE "dbo"."deal"."company" = {{company_id}} OR {{company_id}} IS NULL
Example config in Lime admin:
{
  "widgets": [
    {
      "parameters": [
        {
          "name": "company_id",
          "type": "activeObject",
          "field": "_id"
        }
      ],
      "name": "deal values",
      "type": "question",
      "id": 3,
      "token_expiration": 120,
      "limetypes": ["company"],
      "label": [
        {
          "lang": "en",
          "text": "Total deal value"
        }
      ]
    }
  ]
}
Example with active coworker (Logged in user's coworker)
The following example returns the sum of all deals' value where the resposible coworker is set to the logged in user.
i.e. results are depending on the coworker_id at the time of the execution.
Example in Lime BI SQL editor
SELECT sum("dbo"."deal"."value") AS "sum"
FROM "dbo"."deal"
WHERE "dbo"."deal"."coworker" = {{coworker_id}} OR {{coworker_id}} IS NULL
Example config in Lime admin:
{
  "widgets": [
    {
      "parameters": [
        {
          "name": "coworker_id",
          "type": "activeUser",
          "field": "_id"
        }
      ],
      "name": "My deal values",
      "type": "question",
      "id": 3,
      "token_expiration": 120,
      "limetypes": [],
      "label": [
        {
          "lang": "en",
          "text": "My deals total value"
        }
      ]
    }
  ]
}
id.
Expiration Time
You can configure how long a URL for embedding Lime BI diagrams is valid. It defaults to 2 minutes. You can override the expiration time in Lime Admin.
Warning
By embedding Lime BI diagrams that data becomes publicly available. In order to still keep your data safe, the URL is combined with a token that expires in 2 minutes. On your own risk you can decide to overwrite that per widget.
Setup
Only for cloud applications
Go to the Lime BI -> Setup page in Lime Admin and click Initialize to connect the Lime CRM database to Lime BI. Afterwards pick a language and synchronize the systems.
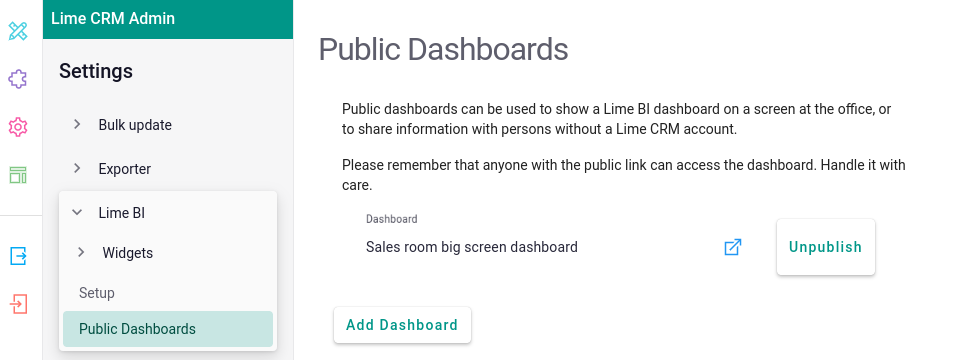
Public Dashboards
Only for cloud applications, for on-premise publish dashboards inside of Lime BI with an admin account
Under Lime BI -> Public Dashboards in Lime Admin you'll find a button to add a public dashboard. The dropdown shows all available dashboards that aren't published yet. By clicking the publish button the dashboard becomes publicly available without any authentication necessary.
Click on the external link icon to reveal its public URL. This URL contains a unique ID that only exists on published dashboards. If you want to reverse the process, click "Unpublish". That will delete the unique ID and make the URL useless. The next time you publish the same dashboard, a new ID will be generated.
Start Page
The lime-bi addon provides two components that you can place on the start page called limebi-graphics and limebi-tile. The graphics component renders the lime-bi diagram directly on the start page. This is recommended for questions that don't need too much space. For dashboards and more detailed questions, you should rather use the tile component. That will render a small tile on the start page while the diagram will be accessible in a dialog.
Independent of which component or which start page you use you need to provide the unique widget name to point to the correct graph. See examples down below.
Multiple Start Pages
Follow the instructions here to set up and configure widgets on multiple start pages. We recommend a limebi-graphics in at least the rectangle size and a small rectangle for a limebi-tile. As properties please provide the unique widget name in the following format:
{
    "config": "<UNIQUE WIDGET NAME>"
}
Start Page Designer
Via the menu icon you can switch to the Start Page Designer. Please check out the Start Page Grid documentation for how you can generally use the configuration.
{
  "components": [
    {
      "name": "limebi-tile",
      "id": "<ID-TO-USE-IN-THE-LAYOUTS>",
      "config": "<UNIQUE WIDGET NAME>"
    },
    {
      "name": "limebi-graphics",
      "id": "<ID-TO-USE-IN-THE-LAYOUTS>",
      "config": "<UNIQUE WIDGET NAME>"
    }
  ],
  "layouts": [ ]
}
Web component on object card
You will need to add the limebi-tile web component to the card view config of the desired Limetype, as shown below :

Desktop Client
How to configure Dashboards
In order to embed dashboards in the desktop client, the activeUser needs to be listed under dataSources for the ActionPad in _config.js. See example further down on this page.
An example config of four dashboards is shown below.
<div data-app="{
    app: 'limebi',
    config: {
        dashboards:
            [
                {
                    dashboardId: '1',
                    userIds: [29901, 1001],
                    title: 'openlimebi',
                    whereToOpen: 'overview'
                },
                {
                    dashboardId: '2',
                    userGroups: ['Administrators', 'Users'],
                    title: 'openlimebi',
                    whereToOpen: 'overview'
                },
                {
                    dashboardId: '3',
                    coworker: {field: 'department', value: 1501},
                    title: 'openlimebi',
                    whereToOpen: 'overview'
                },
                {
                    dashboardId: '4',
                    coworker: {field: 'department', value: 1101},
                    title: 'openlimebi',
                    whereToOpen: 'overview'
                }
            ]
    }}"></div>
The title of each dashboard should match a localization code with the owner addon_limebi.
Users and Groups
There are different ways to configure who should see the dashboards as shown in the example above. Think of this not as a security functionality, but as a convenience functionality.
userIdslets you specify the id of the users that should see the dashboard.userGroupslets you specify for which group the dashboard should be visible.coworkerlets you filter on a field on the coworker card, e.g. department.
Make sure that activeUser is listed under dataSources in the config you find in _config.js (see example further down in this documentation).
Overview and Panes
Lime BI can be embedded and shown in either the overview window or as panes. The overview window is limited to only show one dashboard at a time, but with panes you can show multiple dashboards in separate tabs. Simply specify with the key whereToOpen if you want the dashboard to open in the overview, or in its own pane-tab.
<div data-app="{
    app: 'limebi',
    config:{
        dashboards: [
            {
                dashboardId: '1',
                userGroups: ['Users'],
                title: 'openlimebi',
                whereToOpen: 'overview'
            },
            {
                dashboardId: '2',
                userGroups: ['Users'],
                title: 'openlimebi',
                whereToOpen: 'panes'
            },
            {
                dashboardId: '3',
                userGroups: ['Users'],
                title: 'marketingdash',
                whereToOpen: 'panes'
            },
        ],
    }
}"></div>
Lime BI on a Card
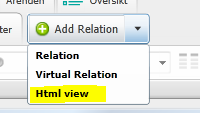
To embed lime BI on a card, for example a company card, add a html-view (tab) on the desired card.
In the config, whereToOpen should be set to explorer and explorer should specify the name of the html-view. Make sure that activeInspector is listed in dataSources for the card through the _config.js config (see further down in this documentation).
<div data-app="{
    app: 'limebi',
    config:{
        dashboards: [
            {
                dashboardId: '2',
                userGroups: ['Users'],
                title: 'openlimebi',
                whereToOpen: 'explorer',
                explorer: 'limebi',
            },
            {
                dashboardId: '3',
                userGroups: ['Users'],
                title: 'marketingdash',
                whereToOpen: 'explorer',
                explorer: 'limebi',
            }
        ]
    }
}"></div>
Embedding Parameters
To inject parameters to the dashboard, make sure that you've published your dashboard with the desired parameters as locked and not disabled or editable.
in the app-config, you can add params with a name (the name of the filter/parameter in lime-bi), a type (there is support for activeInspector and activeUser), and a field (The field on the record or coworkercard depending on type)
<div data-app="{
    app: 'limebi',
    config:{
        dashboards: [
            {
                dashboardId: '3',
                userGroups: ['Administrators'],
                title: 'marketingdash',
                whereToOpen: 'explorer',
                explorer: 'limebi',
                params: [
                    {
                        name: 'myDepartmentParam',
                        type: 'activeUser',
                        field: 'office'
                    },
                    {
                        name: 'mySecondParam',
                        type: 'activeUser',
                        field: 'id'
                    },
                    {
                        name: 'myRecordParam',
                        type: 'activeInspector',
                        field: 'id'
                    },
                    {
                        name: 'myFinalParam',
                        type: 'activeInspector',
                        field: '<field on active inspector>'
                    },
                ]
            }
        ]
    }
}"></div>
Make sure that the card you embed it on has the activeUser and activeInspector listed as dataSources in _config.js.
config: {
  index: {
    dataSources: [
      { type: 'localization', source: '' },
      { type: 'activeUser', source:''}
    ],
    autorefresh : false
    },
  company: {
    dataSources: [
      {type: 'activeUser', source:'',},
      {type: 'activeInspector', source: ''},
      {type: 'localization', source: '' },
      {type: 'relatedRecord', source: 'person', view: 'name;phone;email;mobilephone', alias: 'person'},
    ],
    autorefresh : false
  }
}